Setting up your Environment
Note: In this section, we'll be making the following assumptions:
Plugin name:
"Tutorial Plugin"Plugin ID:
"com.tutorial.plugin"DLL Name:
"tutorial-plugin.dll"
In this chapter we'll be walking you through setting up your development environment. You'll need the following dependencies:
Environment Variables
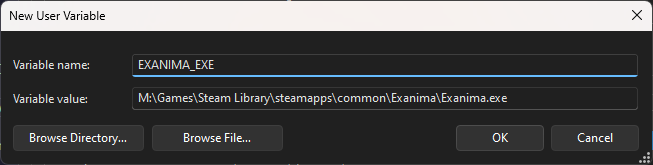
Currently, during development, EMTK relies on the EXANIMA_EXE environment variable being set. For ease of use, we recommend setting this globally.
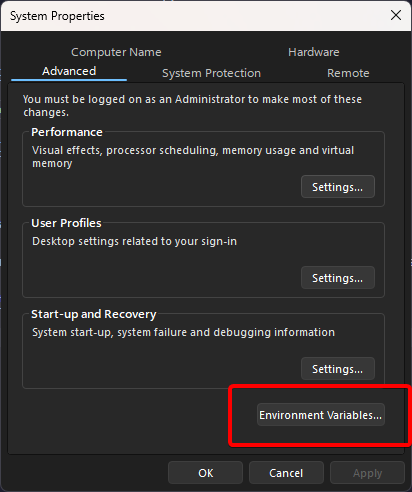
Firstly, open your Start Menu and search for "Environment Variables". Open the program entitles "Edit the system environment variables".

Next, in the window that appears, select Environment Variables....
In the new window that appears, click the New... button under the User variables section.

In the popup, for the Variable name, set this to EXANIMA_EXE. For the Variable value, put in the path to your Exanima.exe.
If it's easier, you can click Browse File... and locate Exanima.exe and double click it.
Finally, click OK, and then OK again to close out of the window. If you already have a terminal or editor open, you'll need to reopen it for the environment variable to be loaded.
Git
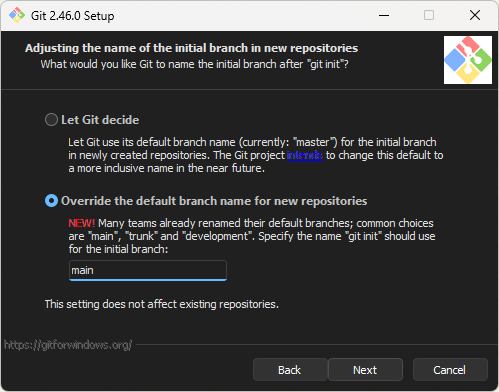
Download and install Git from here.
When running the installer, you should use all the default settings. However for consistency with our projects, we recommend overriding the default branch name to main.
Once installed, open a new terminal and run git — If it works, great! You just have to set up your identity with:
git config --global user.name "Your Name or Username"
git config --global user.email "your@email.com"
The email should match the one you use for GitHub. If you don't have a GitHub account, we'll be creating one in another step, so make sure your email is correct. You can always change it later with the same command.
Rust
Next up is Rust! Firstly, download the rustup installer from here. Click the rustup-init.exe link.
Run rustup-init.exe and it should bring up a terminal. You'll be shown something like the following:
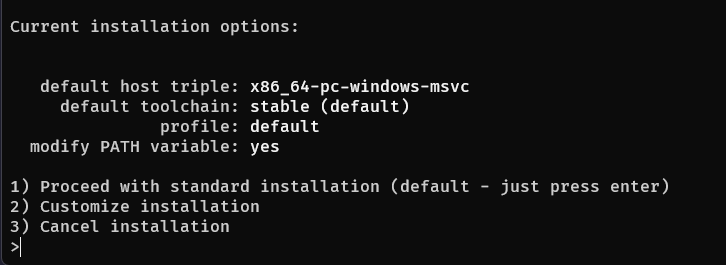
When prompted, just press enter to proceed. If it asks you to install tools (such as Visual Studio Build Tools), install them (this will not install the entirety of Visual Studio, just the build tools).
Once the install is done, open a new terminal and run:
rustup update
rustup toolchain install nightly
VSCode
You can use any editor you want, but VSCode is recommended if you're just getting started and want something that Just Works™.
Firstly, visit the VSCode Website and click the download button. Run the installer and come back here once VSCode is up and running.
Next, you'll want to install rust-analyzer for VSCode. You can install it here, or from the extensions tab in VSCode.
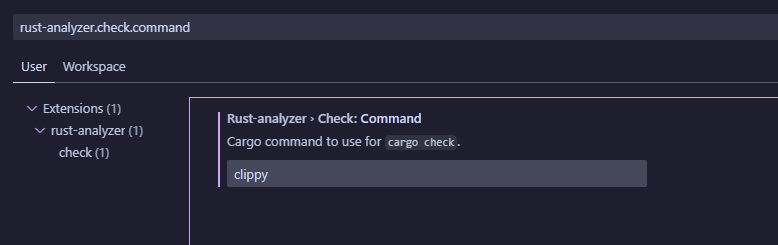
Enabling Clippy
Clippy is incredibly useful for writing good rust code. It can provide suggestions & autofixes on safety and cleanliness of code. It's highly recommended to use it, though not required.
With VSCode open, press CTRL+SHIFT+P and type Settings UI and press enter when you see the right option.

The Settings UI should show up — in the search box, type rust-analyzer.check.command, and change the value to clippy.