Releasing your Plugin
Now that you've created your plugin, and it's tested and ready for release, you'll want to distribute it! Here are our recommendations.
Setting up a GitHub account
GitHub is used by developers to release open-source software. Your plugin should be open source so that people can compile it themselves and PR improvements.
Create a GitHub account if you don't have one already. You can do that here.
Creating an SSH Key
In a terminal, run ssh-keygen -t ed25519 -a 100 and hit enter a few times. You can use a password if you want, but most choose not to.
In your user folder (C:/Users/YourUserName) there will now be a folder called .ssh. If you can't see it, press Win+R and type in C:\Users\YourUserName\.ssh and hit OK.
In there, there should be an id_ed25519.pub file and an id_ed25519 file.
The one ending in .pub is your public key, and the other one is your private key. Never share your private key with anyone — not even GitHub.
Creating a GitHub repo
Go to Your GitHub Keys and add a new SSH key. Give it any title you want (e.g. My PC).
Set the Key type to Authentication Key.
Paste the contents of your id_ed25519.pub in the "Key" section and click "Add SSH key".
Now create a new GitHub repo for your plugin.
Once the repo is created, you'll be presented with a screen like so:
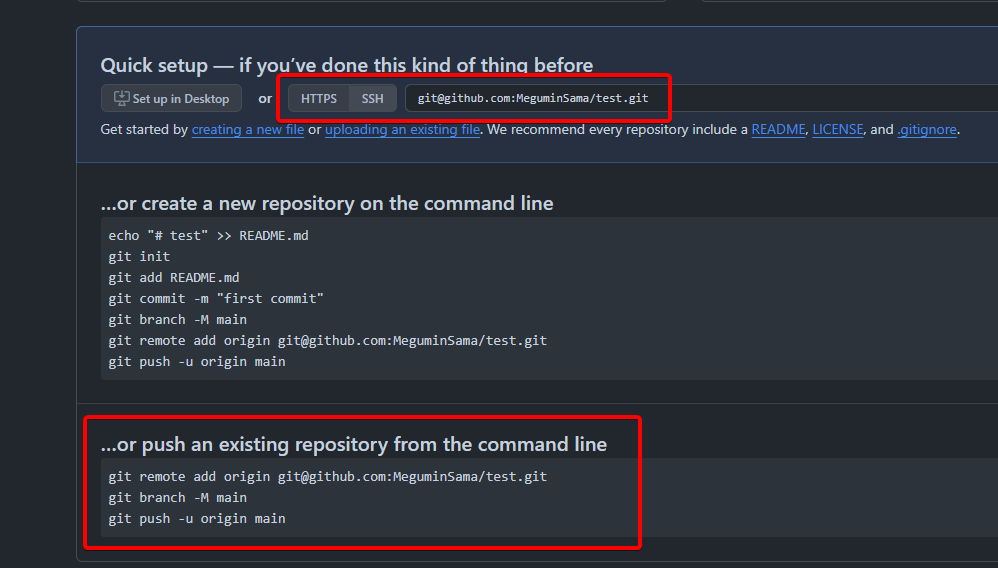
Make sure "SSH" is selected (shown in the first red box in the screenshot).
Pushing your code
Before going further, make sure you set your plugin version in Cargo.toml. Each release should increment this number.
Open a terminal in your plugin project (the folder that contains Cargo.toml).
If it doesn't exist, create a file called .gitignore with the following contents:
/target
Then run the following:
git init
git add .
git commit -m "Whatever message you want for your commit"
If this was successful, look back at the previous screenshot, and see where the second red box is at the bottom of the picture.
Find this code block on the GitHub page for your new repo, and run them in your terminal. It should look something like this:
git remote add origin git@github.com:MeguminSama/test.git
git branch -M main
git push -u origin main
Compiling a Release
To compile your plugin for release, you'll want to make a specific release build which will be much more optimised. Just run:
cargo build --release
It will place the .dll in the ./target/release/ folder, instead of the usual ./target/debug/ folder.
Creating a Release
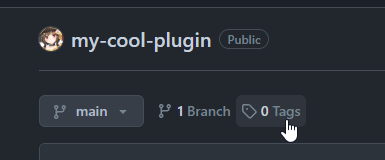
If you refresh your GitHub repository page, you should see your code there now. Below the project name, at the top of the page, there should be some text that says 0 Tags. Click it and create a new release.
Give it a tag — usually this would be your version, e.g. v0.1.0
Give it a title — this should start with the version, but you can add a title after too, e.g. v0.1.0 - My First Release!
Give it a description — this should explain what you've changed since the last release. If it's your first release, you can just talk about what the plugin does.
Give it the files — upload ./target/release/your-plugin.dll and ./config.toml (triple-check that the DLL name matches the executable name in config.toml)
Finally, click "Publish release".