The Exanima Modding Toolkit
Welcome to the Wiki.
Developing Plugins
This section covers the development of plugins. It starts with a tutorial on creating your first plugin, and will then delve into more advanced things you can do with EMF.
Plugin Tutorial
Note: In this section, we'll be making the following assumptions:
Plugin name:
"Tutorial Plugin"Plugin ID:
"com.tutorial.plugin"DLL Name:
"tutorial-plugin.dll"
In this section we will walk you through writing your own plugin for Exanima, from scratch!
We will show you everything, from setting up your work environment, writing your plugin, to publishing it!
This guide assumes you will be writing your plugin in Rust, as it is what the framework is written in, and will have the most support and maintenance.
For learning rust concepts, you could read The Rust Book to get an understanding. If you don't understand some concepts in this guide, the Rust Book might help you understand them.
Setting up your Environment
Note: In this section, we'll be making the following assumptions:
Plugin name:
"Tutorial Plugin"Plugin ID:
"com.tutorial.plugin"DLL Name:
"tutorial-plugin.dll"
In this chapter we'll be walking you through setting up your development environment. You'll need the following dependencies:
Environment Variables
Currently, during development, EMTK relies on the EXANIMA_EXE environment variable being set. For ease of use, we recommend setting this globally.
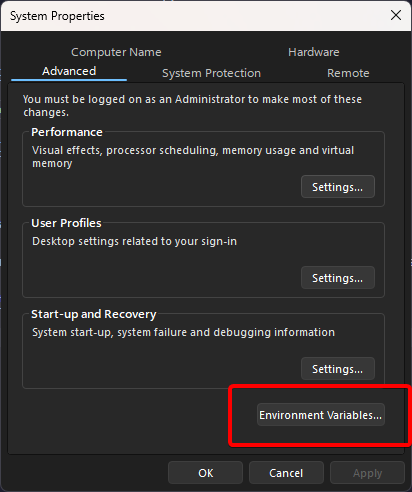
Firstly, open your Start Menu and search for "Environment Variables". Open the program entitles "Edit the system environment variables".

Next, in the window that appears, select Environment Variables....
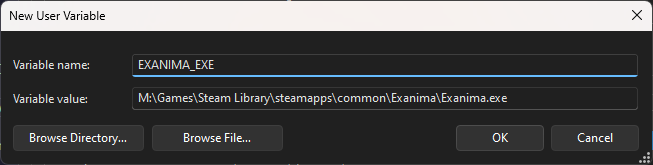
In the new window that appears, click the New... button under the User variables section.

In the popup, for the Variable name, set this to EXANIMA_EXE. For the Variable value, put in the path to your Exanima.exe.
If it's easier, you can click Browse File... and locate Exanima.exe and double click it.
Finally, click OK, and then OK again to close out of the window. If you already have a terminal or editor open, you'll need to reopen it for the environment variable to be loaded.
Git
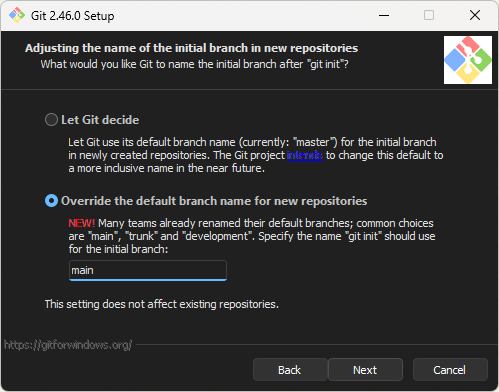
Download and install Git from here.
When running the installer, you should use all the default settings. However for consistency with our projects, we recommend overriding the default branch name to main.
Once installed, open a new terminal and run git — If it works, great! You just have to set up your identity with:
git config --global user.name "Your Name or Username"
git config --global user.email "your@email.com"
The email should match the one you use for GitHub. If you don't have a GitHub account, we'll be creating one in another step, so make sure your email is correct. You can always change it later with the same command.
Rust
Next up is Rust! Firstly, download the rustup installer from here. Click the rustup-init.exe link.
Run rustup-init.exe and it should bring up a terminal. You'll be shown something like the following:
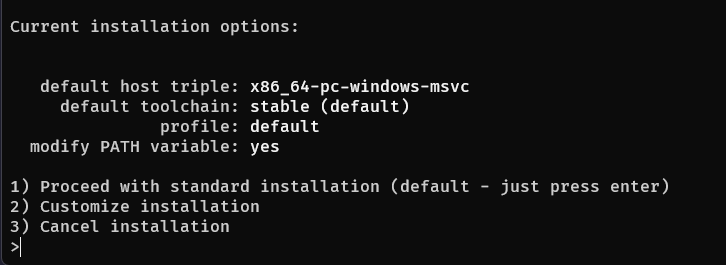
When prompted, just press enter to proceed. If it asks you to install tools (such as Visual Studio Build Tools), install them (this will not install the entirety of Visual Studio, just the build tools).
Once the install is done, open a new terminal and run:
rustup update
rustup toolchain install nightly
VSCode
You can use any editor you want, but VSCode is recommended if you're just getting started and want something that Just Works™.
Firstly, visit the VSCode Website and click the download button. Run the installer and come back here once VSCode is up and running.
Next, you'll want to install rust-analyzer for VSCode. You can install it here, or from the extensions tab in VSCode.
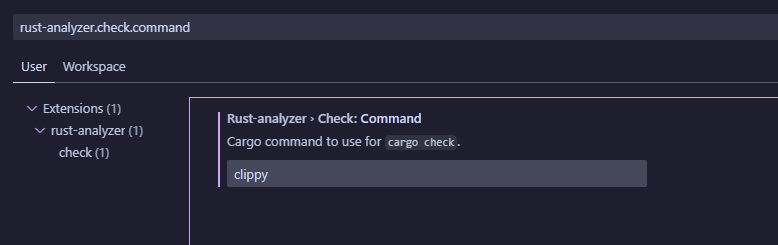
Enabling Clippy
Clippy is incredibly useful for writing good rust code. It can provide suggestions & autofixes on safety and cleanliness of code. It's highly recommended to use it, though not required.
With VSCode open, press CTRL+SHIFT+P and type Settings UI and press enter when you see the right option.

The Settings UI should show up — in the search box, type rust-analyzer.check.command, and change the value to clippy.
Setting up your Plugin
Note: In this section, we'll be making the following assumptions:
Plugin name:
"Tutorial Plugin"Plugin ID:
"com.tutorial.plugin"DLL Name:
"tutorial-plugin.dll"
Now that you've set up your environment, you can start setting up your plugin!
First of all, make a folder to keep all your development work in one place. For example, making a Workspace folder in your Documents folder.
Initializing the project
Open a new terminal in this folder and run:
cargo init --edition 2021 --lib tutorial-plugin
This will create a folder called tutorial-plugin containing a basic rust template. Open this folder in VSCode (or your editor of choice.)
Adding dependencies
In the VSCode toolbar on the top-left, click Terminal > New Terminal. In the terminal that appears, run the following:
cargo add --git https://codeberg.org/ExanimaModding/Toolkit.git --branch plugins emf-rs
cargo add log
cargo add pretty-env-logger
If you open /Cargo.toml, you should see these in the [dependencies] section.
Now add a new section to /Cargo.toml:
[lib]
crate-type = ["cdylib"]
This will tell the Rust compiler to create a .dll file when you build the project.
Your /Cargo.toml should now look similar to:
[package]
name = "tutorial-plugin"
version = "0.1.0"
edition = "2021"

[lib]
crate-type = ["cdylib"]

[dependencies]
emf-rs = { git = "https://codeberg.org/ExanimaModding/Toolkit.git", branch = "plugins", version = "0.1.0-beta.1" }
log = "0.4.22"
pretty_env_logger = "0.5.0"
Setting up the plugin config file
Now we need to make the plugin config for EMTK to read. Make a file called config.toml in the root of your project.
Here's an example of what it should contain currently:
[plugin]
id = "com.tutorial.plugin"
executable = "tutorial-plugin.dll"
enabled = true
name = "Tutorial Plugin"
description = "My cool plugin!"
version = "1.0.0"
supported_versions = [] # Not functional yet
url = "https://github.com/yourusername/your-repo" # This should be the URL to your plugin repo.

[plugin.author]
name = "Your Name"
contact = "some way of contacting you" # This is optional, remove if not needed.
url = "https://your-domain.com" # This is optional, remove if not needed.
The id of the plugin should be in Reverse Domain Notation (e.g. dev.megu.my-plugin-name). If you don't have a domain, just use com.your-name.your-plugin-name.
Setting up the boilerplate
Open up src/lib.rs and delete the default code that's in there. Then paste in the following:
use emf_rs::{macros::plugin, once_cell::sync::OnceCell, safer_ffi::prelude::char_p};
use log::*;

static FIRST_RUN: OnceCell<bool> = OnceCell::new();

#[plugin(id = "com.tutorial.plugin")]
mod plugin {}

#[no_mangle]
pub extern "C" fn enable() {
    FIRST_RUN.get_or_init(|| {
        pretty_env_logger::formatted_builder()
            .filter_level(LevelFilter::Debug)
            .init();
        true
    });

    info!("Tutorial plugin enabled");
}

#[no_mangle]
pub extern "C" fn disable() {
    info!("Tutorial plugin disabled");
}

#[no_mangle]
pub extern "C" fn setting_changed_bool(name: char_p::Box, value: bool) {
    let name = name.to_string();

    info!("Setting changed: {} = {}", name, value);
}

#[no_mangle]
pub extern "C" fn setting_changed_int(name: char_p::Box, value: i32) {
    let name = name.to_string();

    info!("Setting changed: {} = {}", name, value);
}

#[no_mangle]
pub extern "C" fn setting_changed_float(name: char_p::Box, value: f32) {
    let name = name.to_string();

    info!("Setting changed: {} = {}", name, value);
}

#[no_mangle]
pub extern "C" fn setting_changed_string(name: char_p::Box, value: char_p::Box) {
    let name = name.to_string();
    let value = value.to_string();

    info!("Setting changed: {} = {}", name, value);
}
Explaining the code
In this section, we will explain the meaning behind each bit of code shown above.
The imports
The first part of the code is the imports. emf_rs is the library you'll use for interacting with EMF.
It provides utility methods for scanning, reading, writing memory, as well as easing the creation of function hooks and byte patches.
log is just used as a logging library, providing macros like info!, warn!, error!, and debug!. It will prefix the log with the name of your plugin so that logs can be differentiated.
use emf_rs::{macros::plugin, once_cell::sync::OnceCell, safer_ffi::prelude::char_p};
use log::*;
The plugin macro
emf-rs provides a macro that will make it easy to define byte patches and hooks. It also provides helpers for getting settings and scanning memory.
#[plugin(id = "com.tutorial.plugin")]
mod plugin {}
The enable and disable functions
These functions are executed when your plugin is enabled or disabled by EMF. Typically, if a user has your plugin enabled, the enable function will run when Exanima starts.
Where possible, you should strive to support the disable event as well - undoing or disabling all your changes when it runs.
Don't worry though, EMF makes it very easy to enable and disable function hooks and byte patches!
static FIRST_RUN: OnceCell<bool> = OnceCell::new();

#[no_mangle]
pub extern "C" fn enable() {
    FIRST_RUN.get_or_init(|| {
        pretty_env_logger::formatted_builder()
            .filter_level(LevelFilter::Debug)
            .init();
        true
    });

    info!("Tutorial plugin enabled");
}

#[no_mangle]
pub extern "C" fn disable() {
    info!("Tutorial plugin disabled");
}
The static FIRST_RUN is used to run code once. In this case, it's being used to initialise pretty_env_logger which is used to show the plugin's logs.
If this were to run multiple times, it would cause an error.
The log level Debug being used means that info!, warn!, error!, and debug! logs will be shown, but trace! logs will not.
The settings functions
These functions run whenever the user changes a setting in the in-game overlay. When the user hits save, and event will be fired for each setting that has been changed, and will call the appropriate function.
Because your plugin communicates with EMF over C-FFI, unfortunately, the types are a little strange.
You can think of char_p::Box as a pointer to a string in memory. To turn this into a valid rust string, we just need to run .to_string() on it, which will take ownership of the pointer.
#[no_mangle]
pub extern "C" fn setting_changed_bool(name: char_p::Box, value: bool) {
    let name = name.to_string();

    info!("Setting changed: {} = {}", name, value);
}

#[no_mangle]
pub extern "C" fn setting_changed_int(name: char_p::Box, value: i32) {
    let name = name.to_string();

    info!("Setting changed: {} = {}", name, value);
}

#[no_mangle]
pub extern "C" fn setting_changed_float(name: char_p::Box, value: f32) {
    let name = name.to_string();

    info!("Setting changed: {} = {}", name, value);
}

#[no_mangle]
pub extern "C" fn setting_changed_string(name: char_p::Box, value: char_p::Box) {
    let name = name.to_string();
    let value = value.to_string();

    info!("Setting changed: {} = {}", name, value);
}
Testing your Plugin
Note: In this section, we'll be making the following assumptions:
Plugin name:
"Tutorial Plugin"Plugin ID:
"com.tutorial.plugin"DLL Name:
"tutorial-plugin.dll"
Now that you have a basic plugin, we want to make sure we can load it into Exanima.
Compiling your plugin
To build your plugin for testing, just run cargo build. It might take a while to compile first-time, or after changing dependencies.
Once it's complete, your plugin should be available in ./target/debug/tutorial_plugin.dll. Note that rust always replaces hyphens (-) with underscores (_) when compiling.
We usually use hyphens in our dll names, so for example, when we copy tutorial_plugin.dll into the Exanima mods folder, we usually rename it to tutorial-plugin.dll.
You don't have to use hyphens though, so if you'd rather keep the underscore, just make sure you update the executable value in your config.toml to match the dll name:
executable = "tutorial_plugin.dll"
Loading your plugin into Exanima
In your Exanima game folder (The folder containing Exanima.exe), create a mods folder (if it doesn't already exist), and inside there, create a folder with your plugin name (e.g. tutorial-plugin)
Copy ./target/debug/tutorial_plugin.dll into C:/path/to/steamapps/common/Exanima/mods/tutorial-plugin/tutorial-plugin.dll
Copy ./config.toml into C:/path/to/steamapps/common/Exanima/mods/tutorial-plugin/config.toml
Now if you run EMTK, your plugin should be loaded. You can use the F2 key to toggle the in-game overlay, where you can enable/disable your plugin.
As you enable & disable the plugin, you will see the logs in the EMTK console.

The Plugin Macro
Note: In this section, we'll be making the following assumptions:
Plugin name:
"Tutorial Plugin"Plugin ID:
"com.tutorial.plugin"DLL Name:
"tutorial-plugin.dll"
In the previous step, you set up a basic plugin, but now we want to actually get our plugin to do something! In this section, we'll be talking about the plugin macro, and what you can do with it.
The plugin macro
You may have seen this snippet in your code:
#[plugin(id = "com.tutorial.plugin")]
mod plugin {}
The #[plugin(id = "")] macro does a lot of work in the background to make your life much easier.
It provides helper functions for reading settings, and also makes patching memory and hooking functions much easier.
To start with, let's make a basic function hook.
Making a function hook
For our first function hook, we're going to make a very flawed "God Mode" plugin, which you, and every other NPC, invincible. Super useful! (lol).
use std::ffi::{c_char, c_void}; // Add this line to the top of your file, where the other imports are.

#[plugin(id = "com.tutorial.plugin")]
mod plugin {
	#[hook_signature]
	extern "C" fn proc_dmg_and_stamina(motile_ptr: *mut c_void, _: f32) -> c_char {
		register!("53 56 48 8D 64 24 D8 48 89 CB 40 30 F6 8B 05 ?? ?? ?? ?? 89");

		info!("Stopping damage for motile pointer: {:p}", motile_ptr);

		proc_dmg_and_stamina(motile_ptr, 0.0)
	}
}
The code above does the following:
The bytes shown here are a signature used to find the start of a function, which is used to calculate damage done to an entity in-game.
- Scans for the bytes
53 56 48 8D 64 24 D8 48 89 CB 40 30 F6 8B 05 ?? ?? ?? ?? 89in memory. - Gets the pointer to the first byte in that sequence.
- Patches the game code to run our
proc_dmg_and_staminafunction, instead of the original game function. - Creates a reference to the original game function inside
proc_dmg_and_staminawith the same name. This can be used to call the original function. - Calls the original function with the same motile pointer, but replacing the 2nd argument with 0.0, causing no damage to be done to the entity.
Let's go through the code, line-by-line.
The Hook macro and function declaration
#[hook_signature]
extern "C" fn proc_dmg_and_stamina(motile_ptr: *mut c_void, _: f32) -> c_char {
The first line, #[hook_signature], tells the plugin that you're trying to hook a function by using a byte signature.
EMF will scan through the game's memory to find a specific sequence of bytes (?? can be used where you don't know what the bytes will be).
When it finds the pointer, it will use that to replace the original function with the function on the line below.
The second line is where we define our function. extern "C" is used to tell Rust to use the C ABI when compiling the function.
ABI stands for "Application Binary Interface". By telling the Rust compiler to use the C ABI for our function, we're telling it that the function should be callable in the same way it would be in C.
This is necessary for compatibility, as Exanima uses the C Calling Convention, so any functions we expose to Exanima should use the same convention. If it were using a different calling convention, there could be hard-to-notice bugs occuring that might bite us later.
Our function, proc_dmg_and_stamina takes in two arguments:
- A mutable pointer (
*mut c_void) to a "motile" (an entity) - A 32-bit floating point number, which we call
_as we don't use it. This argument represents some kind of damage multiplier.
The function then returns a c_char, which essentially means any 8-bit/1-byte value.
The register macro
The first line in our function is this strange macro, what does it do?
register!("53 56 48 8D 64 24 D8 48 89 CB 40 30 F6 8B 05 ?? ?? ?? ?? 89");
The code above is a special macro, who's behaviour depends on the hook macro provided previously.
Since we provided #[hook_signature], it is expecting us to return a string containing a signature.
The code in this macro will run this code when the plugin is first initialised. It will find the pointer from the signature, and use that to replace the original function with our own one.
To help you visualise what it's doing, we can look at what it'd look like if we were to use #[hook_pointer] instead of #[hook_signature].
register!({
	let signature = "53 56 48 8D 64 24 D8 48 89 CB 40 30 F6 8B 05 ?? ?? ?? ?? 89";
	let pointer = emf_rs::Memory::sig_scan(sig);
	return pointer;
});
You can run any code you want in the register!() macro, but there can only be one per hook or patch, and it must return either a pointer or a signature.
Calling the original function
In the last line, we call the original function. It might look like we're just recursively calling our own function, but there's some helpful code created by our hook macro that lets us call the original function instead.
extern "C" fn proc_dmg_and_stamina(motile_ptr: *mut c_void, _: f32) -> c_char {
	...
	proc_dmg_and_stamina(motile_ptr, 0.0)
}
If for any reason, you wanted to recursively call the hook function, you can use hook_name::func. For example:
extern "C" fn proc_dmg_and_stamina(motile_ptr: *mut c_void, _: f32) -> c_char {
	// This will cause an infinite loop as we recursively call our function.
	proc_dmg_and_stamina::func(motile_ptr, 0.0);
}
Now that we've gone through all the code, head over to the next page to see how we get your hook working.
Toggling Hooks and Patches
Note: In this section, we'll be making the following assumptions:
Plugin name:
"Tutorial Plugin"Plugin ID:
"com.tutorial.plugin"DLL Name:
"tutorial-plugin.dll"
In this section, we'll be getting your new function hook running.
Changing the enable/disable/setting_changed_bool functions
To let our plugin handle settings for us, we'll need to make some small changes to the enable, disable, and setting_changed_bool functions.
pub extern "C" fn enable() {
    FIRST_RUN.get_or_init(|| {
        pretty_env_logger::formatted_builder()
            .filter_level(LevelFilter::Debug)
            .init();
        true
    });

	// Add these lines
	let plugin = plugin::get();
	if let Err(error) = plugin.on_enable() {
		error!("Error while enabling plugin: {:?}", error);
	}

    info!("Tutorial plugin enabled");
}

#[no_mangle]
pub extern "C" fn disable() {
	// Add these lines
	let plugin = plugin::get();
	if let Err(error) = plugin.on_disable() {
		error!("Error while disabling plugin: {:?}", error);
	}

    info!("Tutorial plugin disabled");
}

#[no_mangle]
pub unsafe extern "C" fn setting_changed_bool(name: char_p::Box, value: bool) {
	// Replace the contents with this:
	let plugin = plugin::get();
	plugin.on_setting_changed_bool(name, value, |key, value| {
		debug!("Setting changed: {} = {}", key, value);
	});
}
Automating Settings Changes
When you create a hook with #[hook_signature] or #[hook_pointer], it will assign it an ID of hook::your_hook_name in the plugin instance.
Similarly, when you create a patch with #[patch_signature] or #[patch_pointer], it will assign it an ID of patch::your_patch_name.
The plugin.on_enable() method will loop through all of your hooks and patches, and check if your plugin has a setting for it. If it does, it will check if it's true or false.
If the setting value is true, the hook/patch will be enabled. If false, or if it's not a boolean, the hook/patch will be disabled.
The plugin.on_disable() method will loop through all of them and turn them all off, regardless of the user configuration.
The plugin.on_setting_changed_bool(name, value, callback) method will check if the setting name matches a patch or hook name, and will enable/disable it depending on the new value.
The name and value are then passed to the callback, which you can do anything you want with. If you want it to do nothing, you can do this instead:
plugin.on_setting_changed_bool(name, value, |key, value| {});
Updating config.toml
By default, if a hook/patch doesn't have an entry in the config.toml, it will be enabled when the plugin is enabled, and disabled when the plugin is disabled.
If you want to de-couple this from your plugin's enabled/disabled states, you can add it as a setting to your config.toml.
[[setting]]
name = "Enable God Mode"
id = "hook::proc_dmg_and_stamina" # If it was a patch instead of a hook, the id would be patch::proc_dmg_and_stamina
description = "Enables God Mode"
default = true
This setting will now show up in the in-game overlay in the settings page for your plugin.
Multiple Hooks/Patches under one toggle
It's common that you might want multiple patches or hooks to be managed from one setting.
For this purpose, we provide a #[link_setting("setting_name")] macro. It's used like so:
#[plugin(id = "com.tutorial.plugin")]
mod plugin {
	#[patch_signature]
	#[link_setting("patches_enabled")]
	fn my_first_patch(_address: *mut u8) -> Vec<u8> {
		register!("DE AD BE EF ?? ?? ?? ??");
		vec![0x90, 0x90, 0x90]
	}

	#[patch_signature]
	#[link_setting("patches_enabled")]
	fn my_second_patch(_address: *mut u8) -> Vec<u8> {
		register!("?? ?? ?? ?? EF EB AD DE");
		vec![0x90, 0x12, 0x90, 0x15, 0x00, 0x00, 0x00]
	}
}
In this example, while both patches would be given the settings patch::my_first_patch and patch::my_second_patch, they're both also assigned to patches_enabled.
This means that in your config.toml, you could toggle both of them with one setting like so:
[[setting]]
name = "Enable Patches"
id = "patches_enabled"
description = "enable both patches!"
default = true
More Examples
Now that you've made a basic plugin using hooks, here are some concise examples of things you can do with the plugin macros.
Function Hooks
Hooking By Signature
#[hook_signature]
extern "C" fn my_hook(arg1: u32, arg2: f32) -> bool {
	// Create the hook at the pointer identified using this signature.
	register!("DE AD BE EF ?? ?? ?? ??");

	// Call our own hook function again.
	my_hook::func(1, 3.5);

	// call the original Exanima function, and return the result.
	my_hook(arg1, 2.0)
}
Hooking By Signature With Offset
// When the register!() macro finds a pointer, it will add 0x20 (32) bytes to it.
// This also supports negative offsets, e.g. -0x20
#[hook_signature(offset = 0x20)]
extern "C" fn my_hook(arg1: u32, arg2: f32) -> bool {
	// Create the hook at the pointer identified using this signature.
	register!("DE AD BE EF ?? ?? ?? ??");

	// Call our own hook function again.
	my_hook::func(1, 3.5);

	// call the original Exanima function, and return the result.
	my_hook(arg1, 2.0)
}
Hooking By Pointer
#[hook_pointer]
extern "C" fn my_hook(arg1: u32, arg2: f32) -> bool {
	// Create the hook at the pointer returned from this macro
	register!(
		let pointer = "DE AD BE EF ?? ?? ?? ??";
		// Find our pointer using whatever method we want, and return it.
		emf_rs::Memory::sig_scan(pointer)
	);

	// Call our own hook function again.
	my_hook::func(1, 3.5);

	// call the original Exanima function, and return the result.
	my_hook(arg1, 2.0)
}
Memory Patching
Patching By Signature
#[patch_signature]
// The `address` argument is the pointer found by the register!() macro.
// It cannot be used inside the register!() macro as it doesn't exist yet at that point.
fn my_patch(address: *mut u8) -> Vec<u8> {
	// Apply the patch at the pointer identified using this signature.
	register!("DE AD BE EF ?? ?? ?? ??");

	// Return these bytes to be used for the patch.
	vec![0x1, 0x2, 0x3, 0x90, 0x90, 0x90]
}
Patching By Signature With Offset
// When the register!() macro finds a pointer, it will add 0x20 (32) bytes to it.
// This also supports negative offsets, e.g. -0x20
#[patch_signature(offset = 123)]
// The `address` argument is the pointer found by the register!() macro.
// It cannot be used inside the register!() macro as it doesn't exist yet at that point.
fn my_patch(address: *mut u8) -> Vec<u8> {
	// Apply the patch at the pointer identified using this signature, with the offset applied.
	register!("DE AD BE EF ?? ?? ?? ??");

	// Return these bytes to be used for the patch.
	vec![0x1, 0x2, 0x3, 0x90, 0x90, 0x90]
}
Patching By Pointer
#[patch_pointer]
// The `address` argument is the pointer found by the register!() macro.
// It cannot be used inside the register!() macro as it doesn't exist yet at that point.
fn my_patch(address: *mut u8) -> Vec<u8> {
	// Apply the patch at the pointer identified using this signature, with the offset applied.
	register!(
		let signature = "DE AD BE EF ?? ?? ?? ??");
		emf_rs::Memory::sig_scan(signature)
	);

	// Return these bytes to be used for the patch.
	vec![0x1, 0x2, 0x3, 0x90, 0x90, 0x90]
}
More things you can do with register!()
Register can be a one-liner
// Patch based on signature
#[patch_signature]
fn my_patch(address: *mut u8) -> Vec<u8> {
	// Use the signature
	register!("DE AD BE EF ?? ?? ?? ??");
	...
}
Register can be as many lines, and as complex as you want
#[patch_pointer]
fn my_patch(address: *mut u8) -> Vec<u8> {
	// register!() macro behaves like it's own code block.
	register!(
		// You can run pretty much anything in here. But try to keep it minimal.
		// Plugin initialisation pauses the game until it's complete, so these should be short and sweet.

		// You'd never really want to place a random loop like this in here,
		// it's just used to show you can treat this like any code block.
		for i in 0..16 {
			println!("Looped {} times!", i);
		}

		let signature = "DE AD BE EF ?? ?? ?? ??";
		let pointer = emf_rs::Memory::sig_scan(signature);
		// Increment the pointer by 0x20 (32) bytes. Negative number also work
		let pointer = pointer.byte_offset(0x20);

		return pointer;
	)
}
You can hardcode pointer for testing
Only do this for testing. Never release a plugin with hard-coded pointers.
// Patch based on hard-coded pointer
#[patch_pointer]
fn my_patch(address: *mut u8) -> Vec<u8> {
	// It's only acceptable to hard-code pointers during debugging, testing, and development.
	// Never release a plugin with hard-coded pointers!!
	register!(0x1234567);
	...
}
Releasing your Plugin
Now that you've created your plugin, and it's tested and ready for release, you'll want to distribute it! Here are our recommendations.
Setting up a GitHub account
GitHub is used by developers to release open-source software. Your plugin should be open source so that people can compile it themselves and PR improvements.
Create a GitHub account if you don't have one already. You can do that here.
Creating an SSH Key
In a terminal, run ssh-keygen -t ed25519 -a 100 and hit enter a few times. You can use a password if you want, but most choose not to.
In your user folder (C:/Users/YourUserName) there will now be a folder called .ssh. If you can't see it, press Win+R and type in C:\Users\YourUserName\.ssh and hit OK.
In there, there should be an id_ed25519.pub file and an id_ed25519 file.
The one ending in .pub is your public key, and the other one is your private key. Never share your private key with anyone — not even GitHub.
Creating a GitHub repo
Go to Your GitHub Keys and add a new SSH key. Give it any title you want (e.g. My PC).
Set the Key type to Authentication Key.
Paste the contents of your id_ed25519.pub in the "Key" section and click "Add SSH key".
Now create a new GitHub repo for your plugin.
Once the repo is created, you'll be presented with a screen like so:
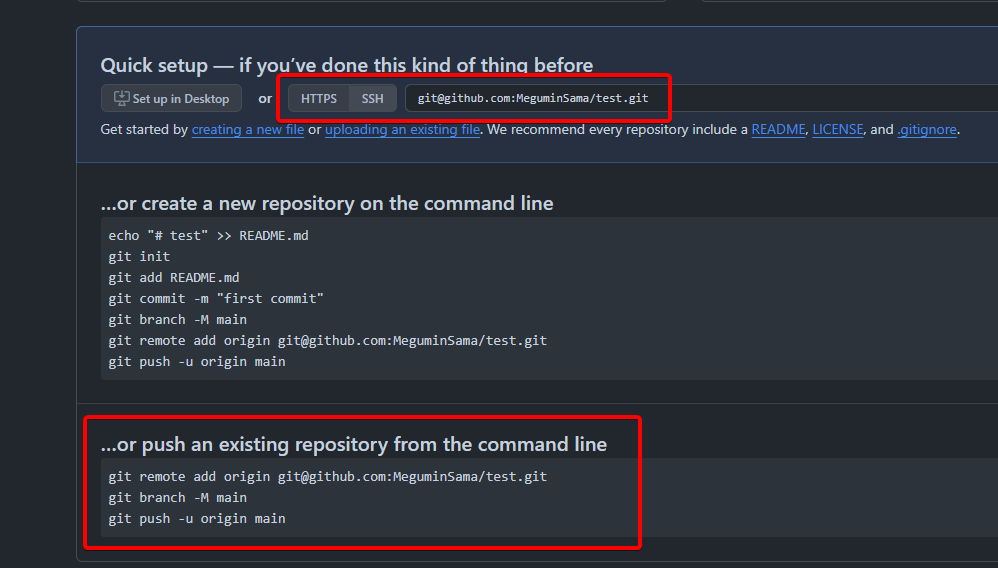
Make sure "SSH" is selected (shown in the first red box in the screenshot).
Pushing your code
Before going further, make sure you set your plugin version in Cargo.toml. Each release should increment this number.
Open a terminal in your plugin project (the folder that contains Cargo.toml).
If it doesn't exist, create a file called .gitignore with the following contents:
/target
Then run the following:
git init
git add .
git commit -m "Whatever message you want for your commit"
If this was successful, look back at the previous screenshot, and see where the second red box is at the bottom of the picture.
Find this code block on the GitHub page for your new repo, and run them in your terminal. It should look something like this:
git remote add origin git@github.com:MeguminSama/test.git
git branch -M main
git push -u origin main
Compiling a Release
To compile your plugin for release, you'll want to make a specific release build which will be much more optimised. Just run:
cargo build --release
It will place the .dll in the ./target/release/ folder, instead of the usual ./target/debug/ folder.
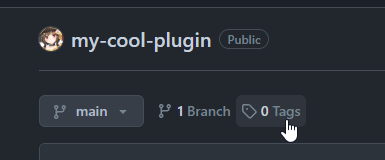
Creating a Release
If you refresh your GitHub repository page, you should see your code there now. Below the project name, at the top of the page, there should be some text that says 0 Tags. Click it and create a new release.
Give it a tag — usually this would be your version, e.g. v0.1.0
Give it a title — this should start with the version, but you can add a title after too, e.g. v0.1.0 - My First Release!
Give it a description — this should explain what you've changed since the last release. If it's your first release, you can just talk about what the plugin does.
Give it the files — upload ./target/release/your-plugin.dll and ./config.toml (triple-check that the DLL name matches the executable name in config.toml)
Finally, click "Publish release".
Converting Game Assets
In order to get started with modding, it is a good idea to start with the game's assets. To begin browsing the assets, it needs to be unpacked to unveil the thousands of assets the game has.
The game assets are stored in packages at the root of the game directory and they are not convenient to modify. They need to be converted into a format that allows for easy modification. These assets include, but are not limited to, textures, models and audio.
Converter
Note: The tool in this section is still in an experimental phase, and does not support unpacking every type of asset into a usable format.
The converter is an executable file capable of two-way conversion. This allows it to be able to convert game assets into usable formats, and vice versa.
The executable is assumed to be in the root of the game's directory to properly work
by default. When executed without providing any arguments, the converter begins unpacking
and creates a .unpacked folder in the current directory where assets will be dumped
into. Once the tool has finished running, feel free to browse the folder for assets.
If you require more advanced use cases of the tool such as packing or specifying
the source/ destination paths, run the converter in a terminal with the --help
flag for options.
The following is a flowchart that will give an idea of what is happening when you use this tool. Start of the flowchart indicates the moment the converter is executed.
flowchart TB;
  subgraph converter[converter::main];
  converter_start([Start]) --> converter_input[/input source\nand destination/];
  converter_input --> repacker_unpack[[repacker::unpack]];
  repacker_unpack --> converter_final([End]);
  end;

  subgraph repacker[repacker::unpack];
  repacker_start([Start]) --> repacker_condition1{Is source\na file?};
  repacker_condition1 -->|yes| repacker_run_unpack1[[repacker::run_unpack]];
  repacker_condition1 -->|no| repacker_condition2{Is source\na directory?};
  repacker_condition2 -->|yes| repacker_loop[/Get next entry in\nsource directory/];
  repacker_condition2 -->|no| repacker_final([End]);
  repacker_loop --> repacker_condition3{Is entry\na file?};
  %% Invisible line to order start and loop to the top
  repacker_loop ~~~ repacker_condition3;
  repacker_condition3 -->|yes| repacker_run_unpack2[[repacker::run_unpack]];
  repacker_condition3 -->|no| repacker_condition4{Entries\nremaining?};
  repacker_condition4 -->|no entries\nremaining| repacker_final([End]);
  repacker_condition4 -->|entries\nremaining| repacker_loop;
  repacker_run_unpack2 --> repacker_condition4;
  repacker_run_unpack1 --> repacker_final;
  end;

  subgraph repacker2[repacker::run_unpack];
  repacker2_start([Start]) --> repacker2_input1[/Read four bytes\nof source file\nto get magic/];
  repacker2_input1 --> repacker2_condition1{Is magic\nvalid?};
  repacker2_condition1 -->|yes| repacker2_metadata_unpack[[metadata::MagicBytes::unpack]];
  repacker2_condition1 -->|no| repacker2_final([End]);
  repacker2_metadata_unpack --> repacker2_final;
  end;

  converter --> repacker;
  repacker --> repacker2;
Development
Welcome to the development of EMTK. This section documents the work behind the project. Use this as a reference for the many concepts that take place under the hood.
Build Instructions
Welcome to the build instructions of the project. Follow along and you'll be able to start contributing. Make sure to fulfill all of the prerequisites before moving past it.
Prerequisites
Visual Studio
EMTK uses Detours which requires the following
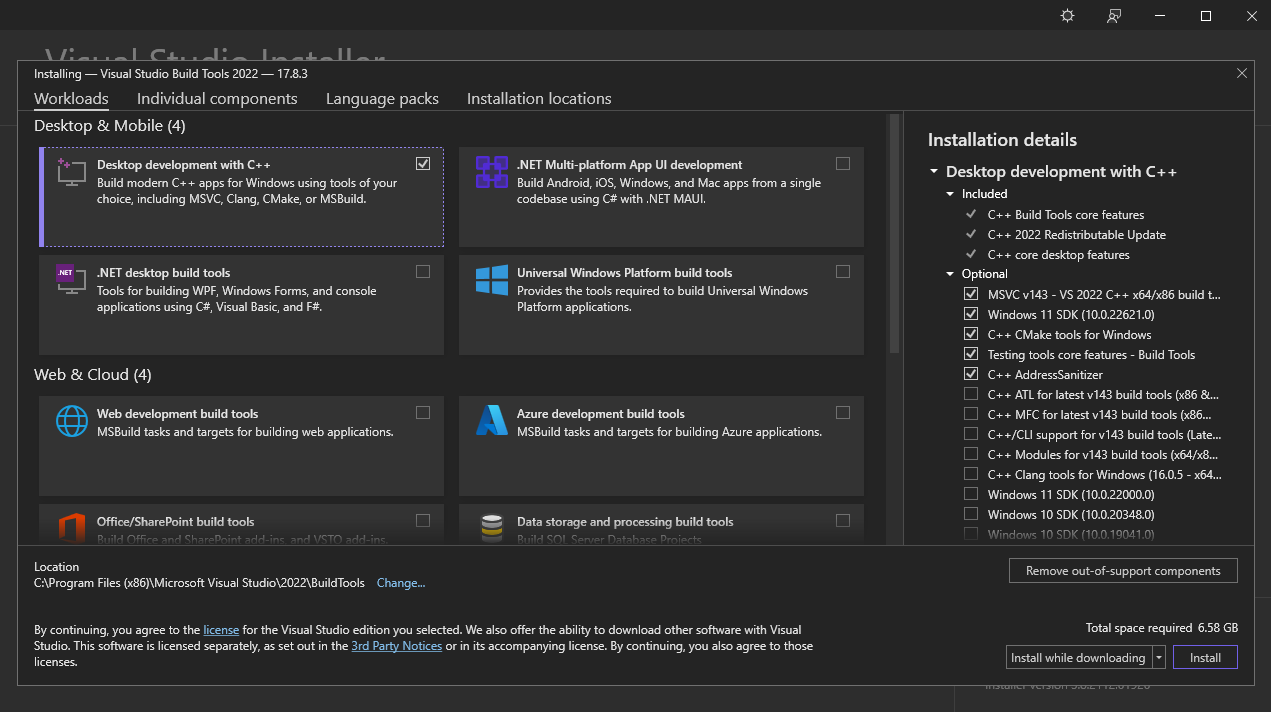 Select Desktop development with C++ and click Install
Steps
Download the repository and go into it.
git clone git@codeberg.org:ExanimaModding/Toolkit.git --recurse-submodules

cd Toolkit
EMF
The following commands will launch Exanima if the path in src/main.rs is correct.
# Change path in src/main.rs
# to the Exanima.exe
# before running cargo make

cargo make && cargo make run
Repacker
The following command will execute the converter executable with argument --help.
cargo run -p repacker --bin converter -- --help
Hint: replace
--helpwith something like--src "C:\Exanima" --dest "C:\Exanima\.unpacked". Replace"C:\Exanima"with your full path to the game's directory.
Building
The converter can be built with cargo. The executable that gets built can then be placed in the Exanima game directory where it can be executed without providing any arguments.
The following commands is equivalent to the cargo run command from the previous section.
cargo build -p repacker --bin converter

cd target\debug

.\converter.exe --help
Game Engine
This section talks about how the Exanima game engine is built, and how we can interface and modify the game logic.
Engine Details
Exanima is written in Delphi, a dialect of the Object Pascal programming language. For optimization, parts of the game are also written in raw x86 assembly.
The game uses an in-house engine built by Bare Mettle, called "Rayform".
Many of the functions used in Exanima use the Borland Register Convention. You can read more about this in FFI (Foreign Function Interface). To interface with these methods, we create wrappers to convert cdecl calls to Borland Register calls.
FFI (Foreign Function Interface)
This section covers how we interface with the Exanima game code and functions.
Rust doesn't use the same function calling convention that Exanima uses, so we need to put in some extra work to interface with these methods. To learn the difference between the two calling conventions we use, read on.
Calling Conventions
Borland Register Convention
Also known as the Borland Fastcall Convention, and not to be confused with the Microsoft and GNU Fastcall conventions.
The Borland Register convention passes the first three parameters, left-to-right, in the order EAX, EDX, ECX.
It then pushes the remaining parameters onto the stack, left-to-right.
In the Register convention, the callee cleans up the stack after it finishes running. The callee refers to the function being called, whereas the caller is the one doing the calling.
To show what this might look like, the following function takes in six numbers, adds them together, and returns them.
fn myFn(a: u32, b: u32, c: u32, d: u32, e: u32, f: u32) -> u32 {
	a + b + c + d + e + f
}

fn main() {
	myFn(1, 2, 3, 4, 5, 6);
}
And in assembly, it looks like this.
; push the last arguments onto the stack, left-to-right.
push 4
push 5
push 6

; add the first 3 arguments into the registers EAX, EDX, ECX, left-to-right.
mov eax, 1
mov edx, 2
mov ecx, 3

call myFn ; the return value is passed to the EAX register
; We don't need to clean up the stack here, as the callee does it
Here, we push the last arguments (4, 5, 6) onto the stack in the order they were written (left-to-right).
Then we pass the first three arguments (1, 2, 3) into the EAX, EDX, and ECX registers, also in the order they were written (left-to-right).
cdecl (C Declaration)
The C Declaration calling convention is a simple calling convention used in the C programming language.
This simple calling convention is ideal for hooking into borland functions, as it is very easy to push the general registers
that borland uses (EAX, EDX, ECX) into the stack, run our code, and then pop them afterwards. We use this instead of writing functions using the register convention, because Rust does not currently support the register calling convention.
In cdecl, all arguments are pushed to the stack in right-to-left order, and the return value of the function is put in EAX.
When talking about passing arguments, "left-to-right" refers to inserting the parameters in the order they were written.
Alternatively, "right-to-left" refers to inserting the parameters backwards.
So 1,2,3,4 would be passed backwards, as 4,3,2,1.
Once the function finishes running, the caller cleans up the stack.
Using the previous example, the assembly would look like this.
; push all arguments onto the stack, right-to-left.
push 6
push 5
push 4
push 3
push 2
push 1

call myFn ; the return value is passed to the EAX register.
          ; on x87, returned floating point value is pushed into register ST0.

; in cdecl, the caller cleans the stack.
; by adding to the stack pointer (ESP), we remove these bytes from the stack.
add esp, 24 ; remove the call arguments from the stack pointer.
            ; 6 arguments, 4 bytes per argument. 4 x 6 = 24
Method Wrapping
As explained in the previous section, Rust doesn't support the Borland Register convention. This means we have to write a wrapper in x86 assembly to make our cdecl functions work in Exanima.
To do this, we push all our borland registers into the stack. This makes it usable as a cdecl function. Because cdecl arguments are pushed right-to-left, this is ideal for us, since eax, edx, and ecx are our first 3 arguments, and are also now at the top of the stack.
We then call our function. x86 has a limitation that it can't call directly to pointers, however it can do indirect calls. Essentially, we make a pointer to our function pointer (this is called an indirect pointer), and call the memory contained in that indirect pointer.
To visualise this indirect function pointer in Rust, it's something like this.
fn my_fn() {...}
fn main() {
	let fn_ptr = my_fn as *mut c_void; // cast the function as a function pointer
	let fn_ptr_indirect = &fn_ptr as *mut *mut c_void; // make a reference to our function pointer
	call(*fn_ptr_indirect); // dereference the indirect pointer, and call the value.
}
Indirect calls in x86 look like this
call DWORD [fn_ptr_indirect]
A full function hook as described above would look something like this:
; push the borland registers into the stack, so we can use it in cdecl.
push ecx
push edx
push eax

; x86 can only call absolute-addressed methods indirectly from memory.
; So we pass a pointer to our function pointer.
call DWORD [&our_function_pointer] ; run our function

; if the function returns true, don't run the original function
; instead, jump to the "end" label
test eax, eax
jne end
; if the function returns false, do the following...

; pop the registers to restore the original stack
pop eax
pop edx
pop ecx

; We jump to the original function instead of using call.
; This preserves the current memory layout.
jmp DWORD [&original_function_pointer] ; jump to the original function
ret ; The original function should clean up the stack for us.
    ; So we just return without cleaning the stack.

	end:
pop eax
pop edx
pop ecx
retn n ; n is the number of bytes remaining in the stack.
       ; this can vary depending on the function being called.
RPK
RPK is an acronym for Rayform Package, and can be found inside the game directory with the game EXE. The RPK format is a package meant for storing the game's assets into one file. These formats can store thousands of assets in just one package which would amount to thousands of files on the file system without it. Packages can be nested within another package.
Under the hood, there is a table of entries containing information about each asset. An entry in this context is a game asset, and the words entry/asset will be used interchangeably.
Layout
The figure below depicts the layout of the RPK format.
block-beta
columns 4
block:header:2
magic["magic<br/>(<span class='type'>u32</span>)"]
table_size_bytes["table_size_bytes<br/>(<span class='type'>u32</span>)"]
end
table_entries["table_entries<br/>(<span class='type'>Vec<TableEntry></span>)"]
chunks["chunks<br/>(<span class='type'>Vec<u8></span>)"]
space:4
block:entry_layout:4
name["name<br/>(<span class='type'>[u8; 16]</span>)"]
offset["offset<br/>(<span class='type'>u32</span>)"]
entry_size["size<br/>(<span class='type'>u32</span>)"]
padding["padding<br/>(<span class='type'>[u32; 2]</span>)"]
end
table_entries --> entry_layout
Header
The header consists of only eight bytes.
#![allow(unused)]
fn main() {
struct RpkHeader {
  magic: u32,
  table_size_bytes: u32
}
}
magic MUST always be 0xAFBF0C01. There are in total four Exanima formats
with the same magic: FDS, FLB, RML, and RPK. The layout is the same across all
of them.
table_size_bytes is the total amount of bytes in the table. Each entry in the table
is 32 bytes long which means this can be divided by 32 to get the total amount of
entries. An entry is correlated to an asset that can be dumped into a file. As an
example, in Exanima 0.9, the Apparel.rpk has a size of 54688 bytes in it's table
which is 1709 when divided by 32. That is 1,709 assets just in that one RPK file.
Table Entry
Each entry has the following structure:
#![allow(unused)]
fn main() {
struct TableEntry {
  name: [u8; 16],
  offset: u32,
  size: u32,
  padding: [u32; 2],
}
}
name is NOT null-terminated
and MUST be 16 bytes long. If the name is not 16 characters long, the
remaining bytes will all be 0.
offset is used to find the starting position of the asset's chunk when the reader
position is at the end of the table.
size indicates how big the asset's chunk is in bytes.
padding is always 0.
About This section
This section contains a mess of notes used during development. This will get cleaned up later.
Delphi Notes
Notes about delphi!
Virtual Method Tables (VMT)
Category: https://www.freepascal.org/docs-html/current/prog/progse32.html
Object Memory Layout
When you create an instance (object) of a VMT, the first value in memory may be a pointer to the VMT itself.
| Offset (x86) | Offset (x64) | What |
|---|---|---|
| +0 | +0 | Pointer to VMT (optional). |
| +4 | +8 | Data. All fields in the order they've been declared. |
Object VMT Layout
| Offset (x86) | Offset (x64) | What |
|---|---|---|
| +0 | +0 | Size of object type data. |
| +4 | +8 | Minus the size of object type data. Enables determining of valid VMT pointers. |
| +8 | +16 | Pointer to ancestor VMT. Nil if no ancestor available. |
| +12 | +24 | Pointers to the virtual methods. |
Source: https://www.freepascal.org/docs-html/prog/progsu165.html
Dynamic Array Types
The reference count and memory size are stored in memory just before the actual start of the array, at a negative offset relative to the address the pointer refers to
Source: https://www.freepascal.org/docs-html/current/prog/progsu163.html
Files
This page is in correlation to Exanima 0.9's release
File Types
| Type | Magic | Name |
|---|---|---|
| FDS | 0xAFBF0C01 | ? |
| FLB | 0xAFBF0C01 | ? |
| FTB | 0x3EEFBD01 | Terrain Palette |
| FTY? | 0xAFCE0F01, 0xAFCE0F00 | Factory? |
| PWR | 0xAFCE01CE | Power |
| RCD | Rayform Character Dialogue? | |
| RCP | 0xDA7AEA02 | Rayform Checkpoint |
| RCR? | 0x00CDAC06 | Rayform Character Role? |
| RDB | Rayform Database | |
| RFC | 0x3D23AFCF, 0x3D21AFCF | Rayform Content |
| RFI | 0x1D2D3DC6 | Rayform Image |
| RFP | 0xAFDFBD10 | Rayform Project |
| RFT | 0x3EEFAD01 | Rayform Terrain |
| RML | 0xAFBF0C01 | Rayform Material Library? |
| RPK | 0xAFBF0C01 | Rayform Package |
| RSG | 0xDA7AEA02 | Rayform Game |
| RSQ | 0x3D000000? | Rayform Sequence |
| SET | 0x6440A401? | Settings? |
| WAV | 0x46464952 | Waveform Audio |
| RUI? | 0x615B0A0D | Rayform In-Game UI? |
| RAB? | 0x7EF6DC8A | Rayform Ambience? |
| RPP? | 0xDCEACCD2 | Rayform Post-Processing? |
| DET? | 0xDCD2EC40 | ? |
| IDK1 | 0x7EF6D298 | gi_emission, gi_inject_f, gi_multipoint |
| IDK2 | 0x3F49C9CA | gldlg01 |
| IDK3 | 0xC2D8DEF2 | gi_inject_g |
| IDK4 | 0xCAEC68C6 | lights |
| IDK5 | 0x7EF6D0A6 | normal |
| IDK6 | 0xD2C8CCCC | tonemap |
| IDK7 | 0xCAEC66C6 | reflection, refraction |
FTB
The section at 5:35 through 6:56 of the video demonstrates terrain palettes.
RDB
Format for storing various data. There are only four RDB files. All files are found in
Character Roles
charroles.rdb
Locales
locales.rdb
Object Database
objdb.rdb
Object Name and Description
objstrings.rdb
RFC
Format for storing models.
RFI
Header
| Offset | Size | What |
|---|---|---|
| +0 | 4 | RFI magic (0x1D2D3DC6) |
| +4 | 4 | Width |
| +8 | 4 | Height |
| +12 | 4 | Unknown property |
| +16 | 4 | S3TC |
| +20 | 4 | Unknown property |
| +24 | 4 | Flags |
| +28 | 4 | Size in bytes after unpacked in memory |
Note: The flags property is currently used to detect if a RFI is compressed with RLE. If flags has 0x40000000, it is RLE.
Types
| Bytes | S3TC |
|---|---|
| 0x813BC600 | DXT1 |
| 0x823BC600 | DXT1 |
| 0x01004200 | DXT1 |
| 0x817BE608 | DXT5 |
| 0x0111C600 | BC4U |
| 0x01006208 | BC4U |
| 0x813B4200 | BC4U |
| 0x01114200 | BC4U |
| 0x01002008 | BC4U |
| 0x0100E608 | BC4U |
| 0x11118400 | BC4U |
| 0x927B8400 | BC5U |
| 0x827BA408 | BC5U |
| 0x1111C600 | BC5U |
| 0x827BE608 | BC5U |
| 0x0100C600 | RGB |
Texture Maps
References
- microsoft/DirectXTex/DDS.h
- DirectDraw Surface
- Pixel Format
- S3 Texture Compression
- FourCC
- 3Dc
- Texture Mapping
- Microsoft Block Compression Direct3D 10
- The Dark Mod DDS Creation
Game Files
Apparel.rpk
Textures for Characters.rpk.
Contents:
- RFI
Characters.rpk
Models of clothing and armor.
Contents:
- RFC
Dependencies:
Notes:
- boots_a.rfc, helm_c.rfc, shirt_a.rfc, and shoes_a.rfc are
the four only files that have
0x3D21AFCFas the first four bytes
CharExt.rpk
Models of hair.
Contents:
- RFC
Dependencies:
Notes:
- References to RFI files have upper case letters and '.rfi' at the end.
- References to DDS files exist, why?
Components.rpk
Models of individual components of a weapon such as blade, guard, grip, pommel, etc.
Contents:
- RFC
Dependencies:
ComponentTex.rpk
Textures for Components.rpk
Contents:
- RFI
Emblems.rpk
Contents:
- RFI
Factories.rpk
Assembles weapons out of components.
Dependencies:
Resource.rpk
Contents:
- FDS
- FLB
- FTB
- PWR
- RCD
- RDB
- RFC
- RFI
- RFT
- RML
- RPK
- RSQ
Notes:
- In RFC files, references to RFI files have upper case letters and '.rfi' at the end
- As of Exanima 0.9,
a new file and filetype, narrator.rcd,
is added with the first four bytes being
0x00000000
actors.rpk
Notes:
- As of Exanima 0.9,
potentially all files have the following first four bytes,
0x00CDAC06, with the last byte,06, potentially representing the version
Manual
Text content for the manual in the main menu using the game's proprietary markdown language. *cn.fds for controller, *km.fds for keyboard and mouse.
- manualcn.fds
- manualkm.fds
Notes:
- Images displayed in the manual are stored in Resource.rpk.
Terrain
- arena7.rft
- arenao1.rft
- arenao2.rft
- arenao3.rft
- arenao4.rft
- exanima01.rft
- exanima02.rft
- exanima03.rft
- exanima05.rft
- exanima05_sw.rft
- exanima07.rft
- exanima07_sw.rft
- exanima08.rft
- exanimac1.rft
Potentially used by RFT.
- grslnd.ftb
- grslndb.ftb
- seaside.ftb
- uwa1.ftb
- uwb6.ftb
- uwb6b.ftb
- uwb8.ftb
- uwswra1.ftb
- vulcanic.ftb
Objects.rpk
Contents:
- RFC
Arena Levels
- arena.rfc
- arena1.rfc
- arena2.rfc
- arena3.rfc
- arena4.rfc
- arena5.rfc
- arena6.rfc
- arena7.rfc
- arenae.rfc
- arenahub.rfc
- arenao1.rfc
- arenao2.rfc
- arenao3.rfc
- arenao4.rfc
Story Levels
- exanima01.rfc
- exanima02.rfc
- exanima03.rfc
- exanima04.rfc
- exanima05.rfc
- exanima05_sw.rfc
- exanima06.rfc
- exanima07.rfc
- exanima07_sw.rfc
- exanima08.rfc
RML
Materials?
Objlib.rpk
Contents:
- RFC
Sound.rpk
Audio for everything in the game.
Contents:
- WAV
Textures.rpk
Textures for CharExt.rpk. Other textures are in Apparel.rpk and ComponentTex.rpk.
Contents:
- RFI